Scheduling Backups |

|

|

|

|
||
|
Scheduling Backups |
|
|
|

|

|
Scheduling Backups
|
Scheduling Backups |
|
|
|
|
||
|
Scheduling Backups |
|
|
|
|
|
SmartCore will automatically backup the Queue Management System Database once a day. A backup will contain not just the ticket records but the complete Queue Management configuration including the settings for the SmartMonitor and SmartPrinter programs. Backups are stored in the Program Data folder and also copied to a user specified location which can be a Network Share. See Restoring a Backup for details on how to Restore the system from the backups you create.
The Program Data folder on Windows XP can be found at C:\Documents and Settings\All Users\Application Data\Ctronix Ltd\SmartCore\backup.
For Windows 7 the Program data folder is located at C:\ProgramData\Ctronix Ltd\SmartCore\backup.
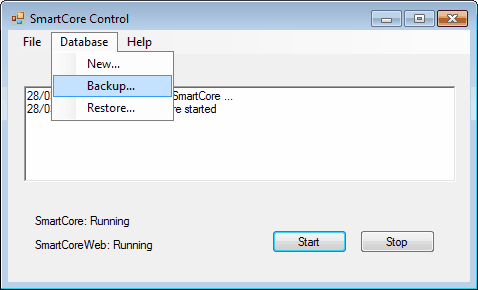
To schedule backups select Database > Backup... from the SmartCore Control Main Menu.
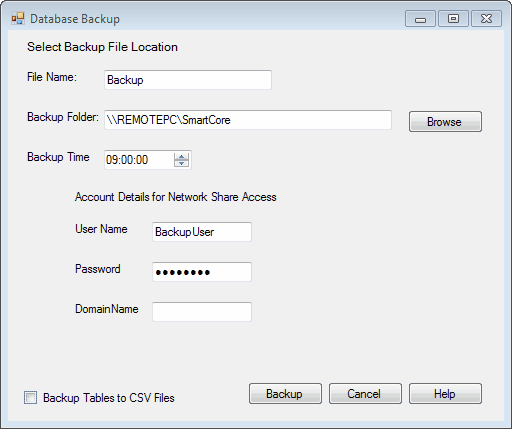
The Database Backup form that opens allows you to choose a file name and a location for the backup. SmartCore will add a three digit, day of year, suffix to the name and a file extension of .cxl.
For example if your chosen name is Backup and the date is 5th January the file that gets written will be called Backup005.cxl. Backups over a year old will be overwritten unless you manually rename them or save them elsewhere.
If you choose a Backup Folder located on a Network Share, i.e a name that starts with "\\" then you must enter a User Name, Password and if the Computer is a member of a Domain. a Domain name. SmartCore will use these account details when reading the backup from the Program Data folder and Writing to your chosen remote location. Therefore the account must have read privileges on the Program Data folder and write privileges on the Remote location.
As well as the Complete Database Backup SmartCore can also Backup the Tables used for generating User Reports to comma separated value Files. SmartCore will add a single digit, day of week with Sunday = 0, suffix to the table name and a file extension of .csv. The files will be stored in the Program Data Folder. Check the Backup Tables to CSV Files CheckBox to enable this feature.
Once the details have been entered press Backup to perform an immediate backup.