

Restoring a Backup |

|

|

|

|
||
|
Restoring a Backup |
|
|
|

|

|
Restoring a Backup
|
Restoring a Backup |
|
|
|
|
||
|
Restoring a Backup |
|
|
|
|
|
Restoring a SmartCore backup is a straightforward process. The existing database if any is deleted and replaced with a backup version that you manually select. A backup contains not only ticket records but also the complete Queue Management configuration including the settings for the SmartCenter, SmartMonitor and SmartPrinter programs.
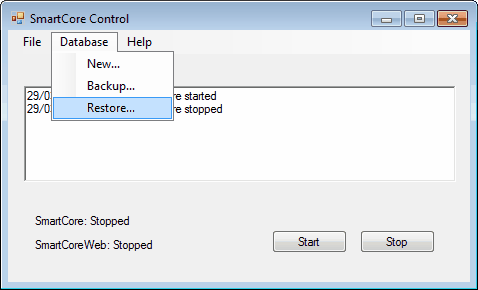
To Restore a Database Select Database > Restore... from the SmartCore Control Main Menu
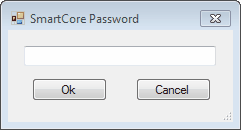
When you select Restore... from the SmartCore Control Main Menu you will be prompted for the SmartCore password. This is to prevent unauthorised access.
Enter the SmartCore password and select Ok. From the database Restore form that opens you can browse to the location where the backups are stored. SmartCore always saves backup to the Program Data Folder as well as copying backups to a user specified location if you have set up scheduled backups.
The Program Data folder on Windows XP can be found at C:\Documents and Settings\All Users\Application Data\Ctronix Ltd\SmartCore\backup.
For Windows 7 the Program data folder is located at C:\ProgramData\Ctronix Ltd\SmartCore\backup.
SmartCore backups all end with ***.cxl where *** is the day of the year that the backup was created.
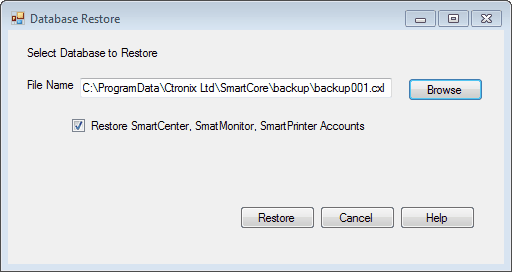
Be sure to select the Restore SmartCenter, SmartMonitor, SmartPrinter Accounts check box if you want to restore the configuration for these programs.
When you click Restore SmartCore will stop the Queue Management System, delete the existing database and replace it with the backup you have selected. Before you click Restore make sure all SmartCenter, SmartMonitor and SmartPrinter programs are shutdown. These programs maintain a connection to the database and SmartCore will not delete a database whilst it is in use.
Once the database has been Restored click Start and the Queue Management System will startup.